
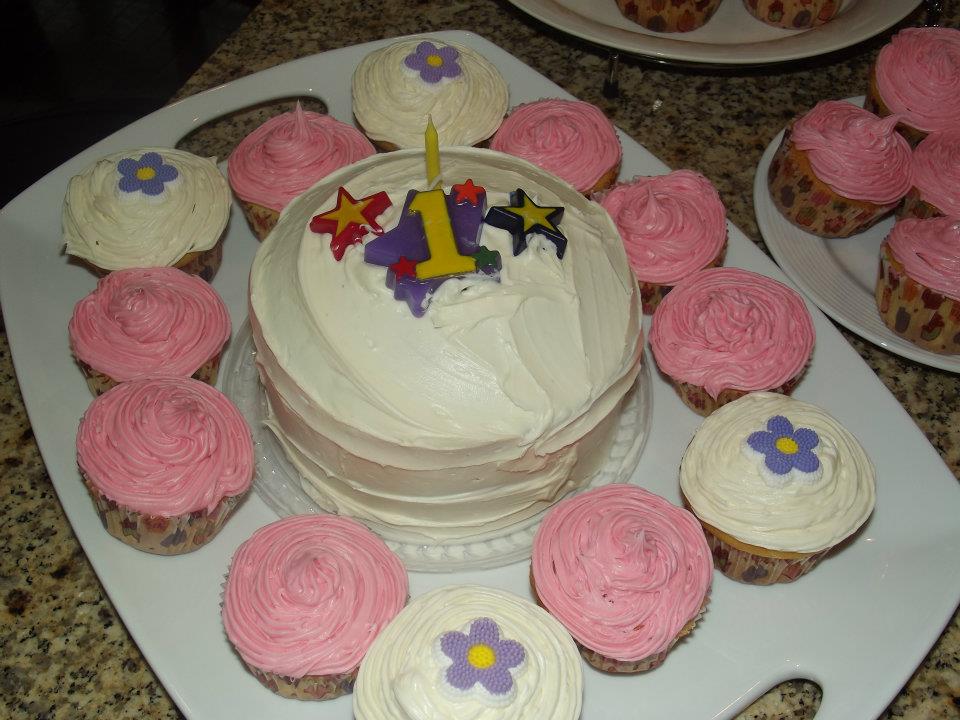
If you had to choose the “frugal” one in my marriage it would be ME. I know a few folks (mainly my mother) who would choose a less flattering term but I wear my “money wise” badge with honor. That being said, for the 1st birthday I suggested that I make the customary smash cake and cupcakes instead of spending wasting money on the store bought equivalents. After all, we weren’t having a huge gathering, just our closest family and friends (there were probably 6 kids). Besides that, Katelyn had no clue what a cake was AND would not remember the party so no need to spend much on the first birthday, right? Plus I thought it would be a fun memory.
 I successfully made that smash cake that year BUT I made a promise that for the 2nd birthday I was going to make a cake much more worthy of the photo album. Fast forward a year and I remembered that promise. I chose a Minnie Mouse theme and I went all in trying to find an image of a cake that would inspire me. I was familiar with fondant from wedding planning. We actually skipped it. But I soon discovered just how popular fondant had become for children’s cakes. I also remembered that I had a friend that had been making her son’s birthday cakes for years using fondant. She was quite good and made it seem super easy. The cakes looked like so much fun. I figured with a few tutorials from the web I could pull this new creative challenge off.
I stumbled upon the cake I wanted on (you guessed it) Pinterest. I found the supplies I needed from Michaels and Walmart (see complete list at end of post). I’m not a baker so a good-ole Pillsbury box yellow-cake mix was gonna have to do for the cake itself. I chose cream cheese icing simply because it’s my favorite. (Note: fondant alone isnt that tasty so adding icing underneath is preferred). I got a box of white fondant and red food coloring so I could get the perfect Minnie Mouse red color. I also bought Oreos to make the ears. I baked the cake according to the directions (I used 2 boxes for 2 layers) the night before the party.
The next morning, I went to work on decorating. It took maybe 2hrs total. I used a knife to cut off the round top of one layer. It was fairly even. But the type of knife I used resulted in crumbs being visible through my icing which didn’t seem right but I figured since it would be covered by fondant it wouldn’t much matter. Next I worked with the fondant. I made the white polka dots first. I rolled out the white fondant and used a small metal cookie cutter. I then cut one long strip to be used for the trim. I noticed some fondant sticking to my counter. To be safe, I laid each completed piece on some aluminum foil. It just made sense to me.
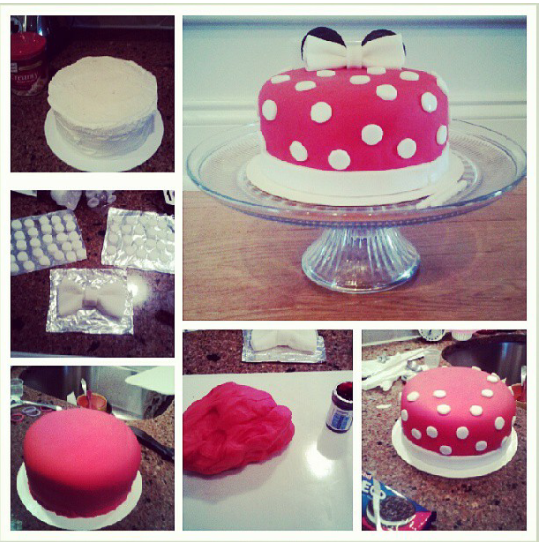 Next I worked on the bow. I watched this tutorial at least 5 times the previous night to get it right. Then it was time to dye the remaining fondant red to cover the cake. It took about 6-8 drops of food coloring and lots of kneading to accomplish. I rolled it out flat and wide and carefully covered the layers. That took 3 attempts. Use a pastry cutter to trim. I did rip the fondant a little but it wasn’t anything a cleverly placed white polka dot couldn’t hide. Lol. I carefully added the remaining polka dots and the trim. I used water as my glue. I lightly brushed it on with a paint brush. I placed the bow on top. Next, I added the Oreo cookies as ears behind the bow. Getting those Oreo cookies apart without breaking one seemed impossible. It felt like I spent an hour because they just kept splitting. But I finally got it right. For my first time, I thought the cake turned out nicely. And I had fun trying to recreate the inspiration photo. Katelyn was thrilled and that was most important.
Lessons Learned: 1. Invest in a cake leveler. It would have made the process of creating a smooth top much easier. 2. Use cornstarch or confectioners sugar so fondant doesn’t stick to counter. 3. Never work with Oreos again. HA!
It took me a year to play around with more fondant. I guess I was too busy with life to enjoy my new talent. Yes I’m calling it a talent darnit…since I didn’t burn down the house, no one got food poisoning and I didn’t cry while completing the project. Anywho here is my fondant Part II recap.
For the 3rd birthday Katelyn chose the theme. She went with DocMcStuffins! There were tons of cute ideas out there for a DocMcStuffins cake. I was instantly excited. I found my inspiration cake and went to work. I bought a leveler 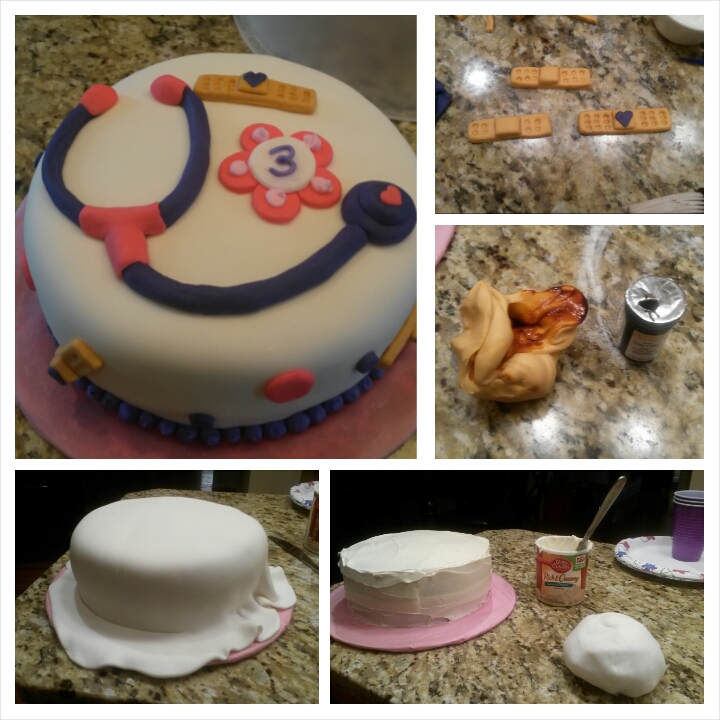 this time and confectioners sugar. Both items made things much easier. For the most part, I followed the same steps as with the Minnie Mouse cake. However, this cake required more colors. I had been able to find purple and pink at Michaels so only had to use the dye to obtain the “band-aid” brown color. I also purchased a cake board and covered it in pink paper to match the theme. I used a butterknife to design the band-aids and hearts. The hardest thing with this project was making the #3. This was a last minute idea. I had finished the cake and it seemed to be missing something. I was going to use a #3 candle but decided against it. Well without a number stencil I found it quite difficult to do that. In the end I used lavender icing (in the can) and used a Wilton tip to write a 3 on a flower that I created from fondant.
Lesson Learned: Purchase number and letter stencils.
Materials Needed:
- Box Cake or be fancy and make one from scratch (qty based on # of layers)
- Icing
- Fondant (in colors as desired; 1 box of white was enough for Minnie Mouse cake)
- Leveler
- Plastic Rolling Pin
- Cookie Cutters/stencils
- Circle fondant cut-outs (for polka dots)
- Confectioners Sugar
- Pastry cutter (or butterknife)
- Paint brush
- Food Coloring
- Cake board (optional)
If you have ever thought about making a cake with fondant I want to encourage you to do so. It is quite fun! And fondant is very forgiving so you can easily correct mistakes. Don’t worry about being creative because there are tons of ideas already out there that you can recreate and tweak to customize to your taste. And if you have small children this is the perfect time to do it! They won’t even know if you mess up! 🙂 What a great memory to share with them later. For the 4th birthday I’m going bigger in cake size and I’m going to play around with actually creating figurines from fondant! I CANT WAIT!
Have you tried your hands at fondant? How did it go? To all my real bakers out there any tips to add?


Comments
Janine
Great post! I love craft projects and baking! I decorated sugar cookies for a baby shower once and everyone thought I had ordered them from a professional bakery. I am long overdue to try a fondant cake. My bonus child doesn’t like frosting/icing (either does my husband), but they may like the fondant.
LaToya
The fondant is a bit tasteless to me so that may work to your favor. 🙂 GL!
Janine
Great post! I have always wanted to decorate a cake using fondant. Now, I am definitely inspired – you make sound pretty easy. What brand of fondant do you use?
LaToya
Thanks for stopping by Janine! I used Wilton fondant. Michaels and Walmart sell that brand. You should definitely give it a try. Come back and let us know how it goes.